A while ago I wrote a post on setting up HyperV networking where I basically bridged all networks to the guests and let them worry about which one they needed to use.
Albeit a little complicated it worked pretty good. However sometimes the guests messed it up and couldn’t figure which network to use for the AD and DNS and also the Default Gateway setting could be stuck on the “wrong” network.
Therefore here is a new and vastly better approach J – using only one internal network and the windows Internet Connection Sharing (ICS).
(This is essentially a “NATing” approach where the other was primarily a “Bridging”)
Caution: The two network configurations are inherently incompatible; you should choose only one to go for.
The Goal (still…)
Is quite simply that I want my VMs to just work seamless with my Host machine and whatever network connection I’m using and – in my case – a guest AD.
This used to be really simple with VMWare Workstation but after converting my machines to Hyper-V there is a catch or two.
This post covers:
Part 1: Simple Network setup, if you need a simple fix this is it
Part 2: Automatic network sharing, this is what makes it shine
Part 3: Advanced stuff for the last 10% of needs
Note that this applies to a mobile working scenario where I run everything on a laptop and it frequently changes whether I’m using a wired, wifi or mobile net.
The Environment
I do SharePoint development and this post is written in that context, however it should all be generally applicable to Hyper-V.
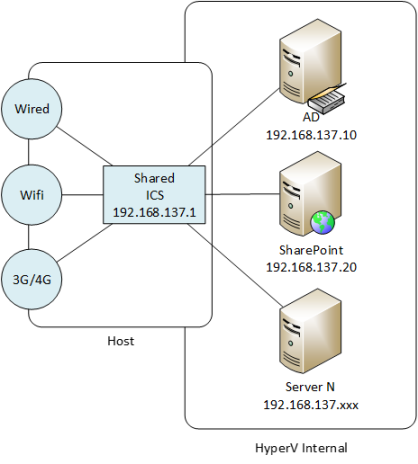
My local Hyper-V (SharePoint Dev) environment (simplified) consists of two guests:
- An AD server that should not communicate outside my box
- A SharePoint server that need to communicate with my host, the guest AD and generally networking
In addition I need to connect with Remote Desktop to the guest machines with the host (the Hyper-V console is useless for all but boot and network configurations).
Part 1: Basic Network
We’ll set the network up as:
The Hyper-V Network Settings
The steps to configure the network on the host are:
-
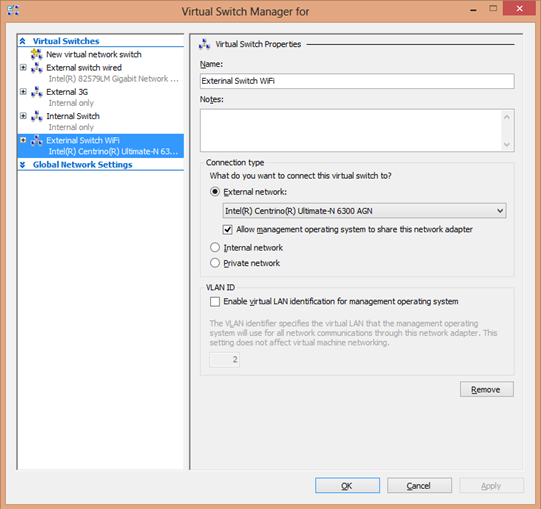
Create an internal switch for the connection between host and virtual machines (and in my environment between the AD and SharePoint server)
- Name it appropriately (I just like that)
-
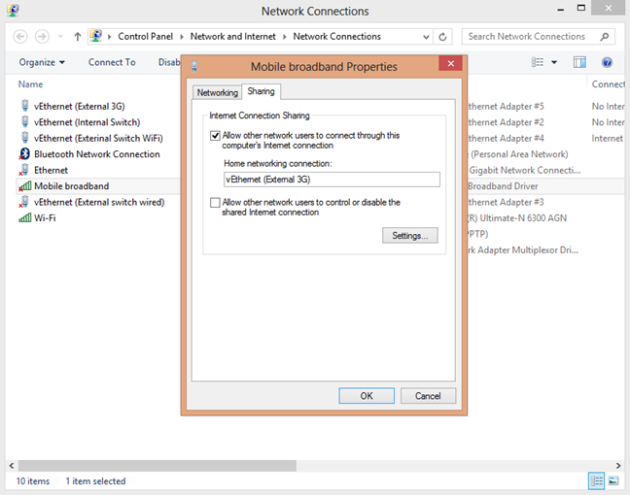
Go to your host and select the currently active network connection, choose Properties, Sharing and choose the HyperV switch
-
When your active network connection changes, you’ll have to share the new connection (there can be only one)
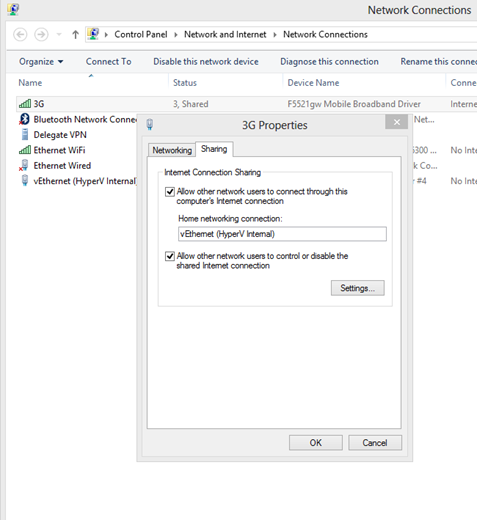
That’s it for the host.
The Guest Configuration
We need to configure the guests themselves. Connect to each one using the Hyper-V console:
-
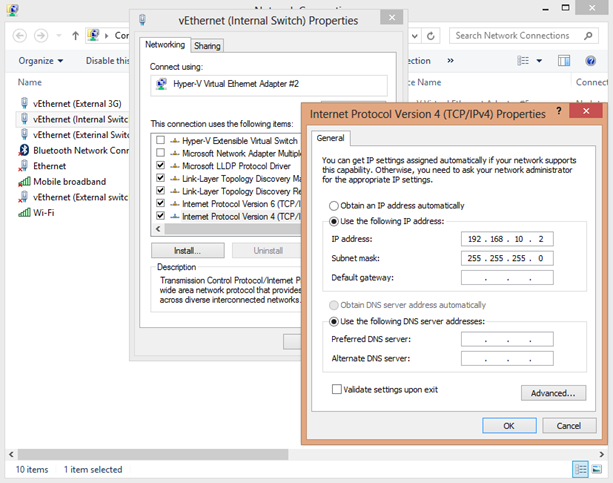
For the AD guest server (internal communication only) assign the ip address 192.168.137.10 (pick the last number as you like) – there should only by one network adapter
- Set the default gateway to 192.168.137.1 (which is your host) and DNS to 127.0.0.1
- When you change the IP address for an AD server you need to restart it so that the DNS is properly updated
- Reboot the AD
-
For the guests that need network access:
- Assign the chosen IP to the internal network, in my case, 192.168.137.20 (a unique one for each guest), use 192.168.137.1 as default gateway, use 192.168.137.10 (your AD) as your single DNS
-
Test it, on each guest:
-
Lookup an AD user or two – do you have a proper connection between the guests?
-
Ping 192.168.137.1 – does your gateway respond?
If not have a close look at ICS, google various troubleshooting tips
- Ping 8.8.8.8 – do you have basic external network?
-
Ping google.com – do you have DNS resolution working?
In case of DNS lookup problems: Have a look at your DNS and possibly remove any DNS forwarders that you may have (google it!)
- Browse a site – is the firewall open?
That’s it for the guests!
RDP Access
Finally you’ll want to access the guests through RDP so stuff like copy/paste and fullscreen works. You can of course use whatever RDP manager you prefer, here I’ve just used the standard one.
Make a connection for each Guest access and save it somewhere (Desktop?).
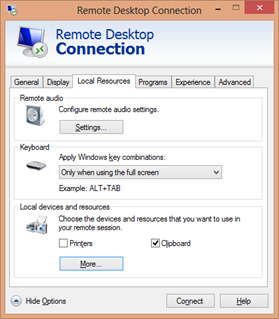
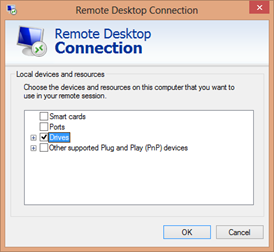
Run the command “mstsc” and setup the options you like and save the Connection. In particular enable “Clipboard” and “Drives” in the “Local Resources” tab. That will enable you to copy/paste both text and files between the guest and host.
In my case:
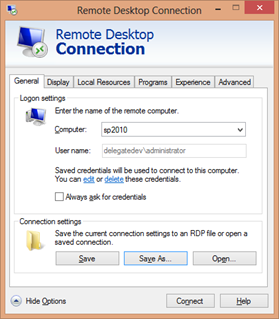
Note that I have added “sp2010” in my host file as 192.168.137.10. You can also use just the IP.
Part 2: Making it Shine – Automate it
Now for the fun part. I want it all to to just work.
No fiddling around with sharing this or that network adapter, just make the one I’m using for the host the one that is shared.
Using PowerShell and the system task scheduler it’s doable.
To install:
- Download and unzip this file, e.g. to C:\AutoNetworkSharing
- Right click the dll and ps1 file, choose properties and “unblock” them
-
Test 1:
- Start an administrative shell
- Execute “powershell.exe –File c:\AutoNetworkSharing\AutoSwitch.ps1”
- Watch the printed output. It should share your active network connection with your HyperV network adapter and write what it does in the process
- Run it again and make sure that this time it detects that it need not change the sharing properties
- Go to your Task Scheduler
-
I like to create a new folder,e.g.”MyCustomTasks” to keep track of what I’m doing:
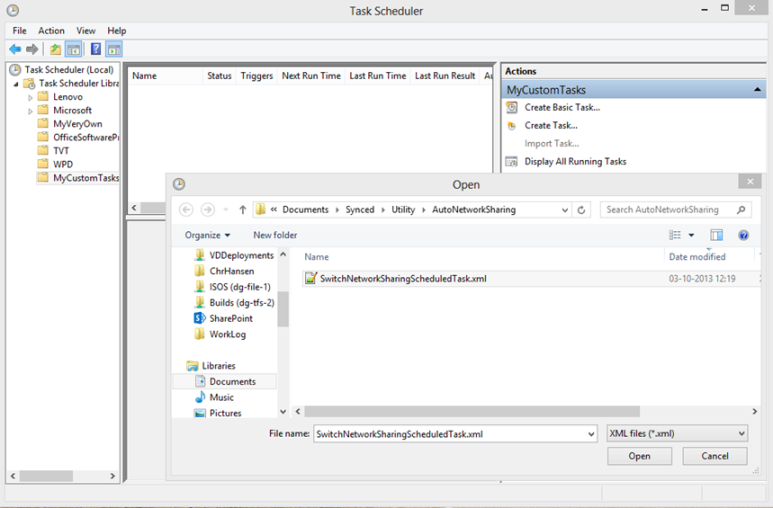
- Click “Import Task”
- Choose the “SwitchNetworkSharingScheduledTask.xml” file (in the zip)
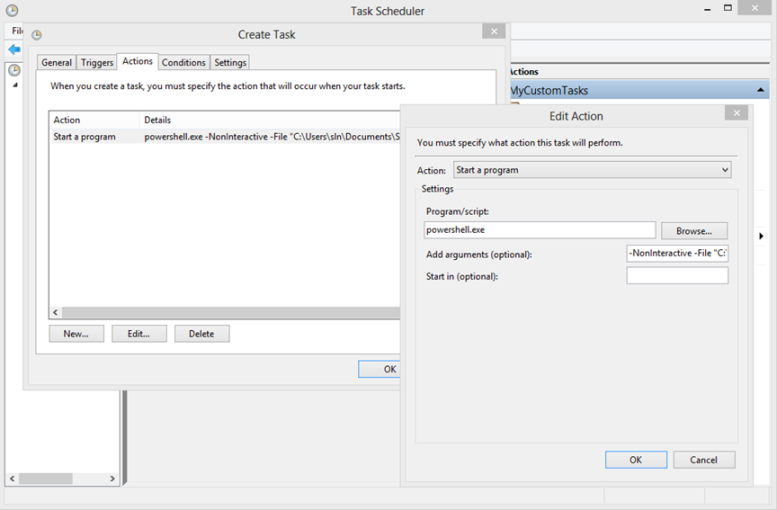
- On the “Create Task” dialog, go to the Actions tab and correct the file name parameter to match your location:
-
Have a look at the “Triggers” tab, here is the magic that ensures that this task is fired whenever your network connection changes
-
Test 2:
-
Enable and disable your network adatpers to see the “Sharing” label move around as you do so. It should take no more than 10 seconds to see the sharing property change
-
If it doesn’t work have a look in the history tab on the scheduled task to see whether the task starts or if’s the actual script that fails
One caveat: The HyperV network will jump briefly when the network changes, so your RDP session will briefly freeze.
The actual script is mostly about deep diving into the WMI and looks like this (Note: Do not copy/paste this directly. Quotes and dashes will likely be wrong, take it from the zip file):
Import-Module ( join-path (Split-Path -Parent $MyInvocation.MyCommand.Path) “IcsManagerLibrary.dll” )
#Fetch the active adapter and Hyperv NIC from WMI
$activeAdapters = Get-WmiObject win32_networkadapterconfiguration -Filter ‘ipenabled = “true”‘
#CHANGE THIS LINE IF you need to handle multiple HyperV nics to you own rules
$hypervNics = $activeAdapters |? { $_.ServiceName -eq ‘VMSMP’ }
if( @($hypervNics).Count -ne 1 ){
Write-Error “Cannot auto switch, found $(@($hypervNics).Count) hyper-V NICs”
return
}
#Get the adapters with network connectivity
$activeNetworks = Get-WmiObject -Class Win32_IP4RouteTable -Filter “Destination=’0.0.0.0′” |% { Get-WmiObject win32_networkadapterconfiguration -Filter “ipenabled=’true’ and InterfaceIndex=$($_.InterFaceIndex)” }
if( @($activeNetworks).Count -ne 1){
Write-Warning “Multiple active NICs found, picking one at random”
$activeNetworks = $activeNetworks[0]
}
#Get the “real” NIC name, required by the cmdlet
$hyperVTypedNIC = Get-WmiObject -Class Win32_NetworkAdapter -filter “DeviceID = $($hyperVNics.Index)”
$activeTypedNIC = Get-WmiObject -Class Win32_NetworkAdapter -filter “DeviceID = $($activeNetworks.Index)”
#Retrieve what is shared by ICS now (if anything)
$sharedPublicNetwork = Get-WmiObject -Class HNet_ConnectionProperties -Namespace “ROOT\microsoft\homenet” -Filter ‘IsIcsPublic = “true”‘
$sharedPrivateNetwork = Get-WmiObject -Class HNet_ConnectionProperties -Namespace “ROOT\microsoft\homenet” -Filter ‘IsIcsPrivate = “true”‘
#Do a test to see if the selected NIC to be shared is already shared (then do nothing)
if( $sharedPublicNetwork -and $sharedPublicNetwork.Connection -match $activeTypedNIC.GUID -and $sharedPrivateNetwork -and $sharedPrivateNetwork.Connection -match $hyperVTypedNIC.GUID){
Write-host “Already shared ‘$($activeTypedNIC.NetConnectionID)’. Skipping.”
return
}
else{
Write-host “Sharing ‘$($activeTypedNIC.NetConnectionID)’ to ‘$($hyperVTypedNIC.NetConnectionID)'”
Enable-ics -Shared_connection $activeTypedNIC.NetConnectionID -Home_connection $hyperVTypedNIC.NetConnectionID -force $true
Write-host “Done”
}
It assumes that there is only enabled HyperV network adapter (if not change the marked line) and it will pick a random active internet connection to share if there is more than one.
Note: I’m dependent on the “ICSManager” module developed by Utapyngo for handling the ICS part.
Part 3: Going advanced
Well sometimes you need a bit more J
Here are the few things that I found myself needing.
Multiple subnets
If you have more than one HyperV teams, e.g. multiple AD controllers that should be kept separate, you need to split the network.
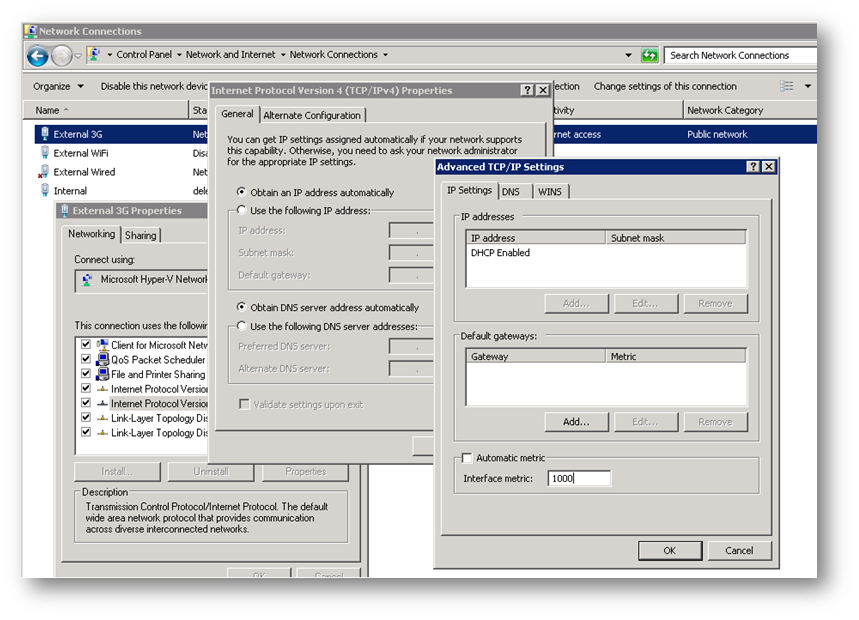
As the ICS service will reset your hosts’ HyperV adapter to an ip of 192.168.137.1 and reset all submask and DNS settings, you shouldn’t mess with them.
On the other hand it is quite possible (and easy) to separate your teams by specifying smaller submasks in the guests, i.e. assign the submask 255.255.255.128 to all guests and assign
- AD in team 1 an IP of 192.168.137.10
- AD in team 2 an IP of 192.168.137.130
And subsequent guests IPs within their network range. Keep the default gateway as 192.168.137.1 for all guests.
Multiple HyperV networks and bridges
In the case of multiple HyperV cards you will need to modify the PowerShell script file, to select the proper HyperV card to share with. Simple give your desired HyperV adapter an easy readable name in the host.
Perhaps just hardcode the HyperV adapter name in call to the “Enable-ICS” commandlet.
Happy networking 🙂


 That’s it for the guests!